First Person Body
Overview
NeoFPS now contains a number of features for adding an animated 3D body for your player character. These features allow you to drive animations from the motion graph, as well as syncing weapon and body animations seamlessly.
Alongside the information below, there is also a youtube playlist that gives a deep dive explanation of the different options here:
Demo Packages
The NeoFPS demo assets do not currently include character animations, so you need to add your own animations to make them work. See the included readme text file in the same folder for instructions on installation.
In the first person body folder (NeoFPS\Samples\SinglePlayer\Scenes\FeatureDemos\FirstPersonBody) you will find packages set up with demo controllers and characters for the following animation packs:
- Kubold's Movement Animset Pro and Rifle Animset Pro (both are required).
- MoCapOnline's RIFLE Basic - Mocap Animation Pack.
First Person Body Types
There are 3 main types of first person body that the new systems are designed to support:
A full body with arms, torso and legs. Hand animations are synced to animated proxy objects on the weapons. This gives the most realistic first person body, similar to what you might see in a mil-sim type game.
Torso and legs, with the weapons containing animated arms. This allows you to look down and see your feet while keeping the weapon framed on the camera similar to the vast majority of first person games.
Split weapon rigs, where the arms and the weapon are rigged separately and have animations that sync up. This does not include torso and legs so you cannot see your feet when you look down. Its main strength is it makes it easier to swap out character arms.
Full Body Setup
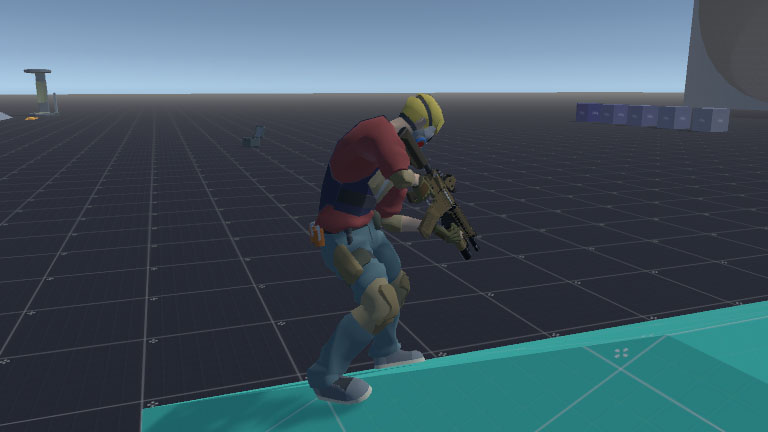
The full body setup means using a single character rig that includes the legs, body, arms and head.
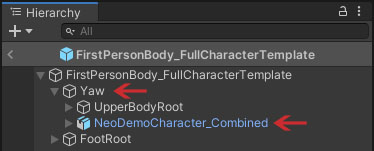
The body uses steering, which means that it needs a separate Yaw transform under the root (local position and rotation all zeroed out) as a parent of the UpperBodyRoot object. The character body model and animator should be placed under this Yaw transform, alongside UpperBodyRoot.
With that object in place, you need to set the MouseAndGamepadAimController so that its Yaw Transform points at the Yaw object, and Aim Yaw Transform points at UpperBodyRoot. The Steering Rate setting should then be set to some value above 0 and below 1, such as 0.25.
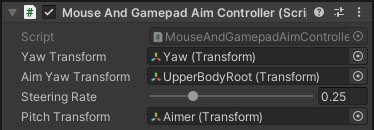
This means that the UpperBodyRoot will turn separately to the character heading, and the character will rotate towards this each frame based on the steering rate.
The camera position is constrained to a proxy object attached to the character rig's head bone. This requires a FirstPersonCameraTransformConstraints component attached to a new parent object of the PlayerCameraRoot object.
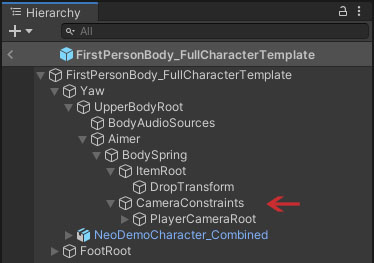
The constraints component should be set so that its Default Target is pointing at a proxy object parented to the character skeleton's head bone. This means that the camera will move with the head as the character animates. Set The Position Strength to 1, and Rotation Strength to zero. You don't want animated rotation of the character's head to affect the camera rotation or else this could cause motion sickness or force the camera to point in random directions. Damping smooths out the constraint's position matching and removes jitter from the animation. 0.25 should be fine.
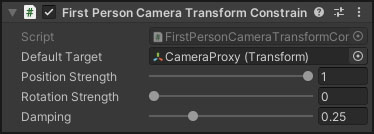
Since the camera position is now controlled by the character skeleton, you should remove any head bob or position bob component from the PlayerCameraRoot object.
Wieldable items (weapons and tools) are added to an object called the item root that is set in the inventory. For most FPS, that object would be positioned to match the camera so that their view-models and animations are fitted to the screen. With a full body FPS character, this can cause the weapon to rotate away from the character's body when they look up or down. To get around this, the weapons are aligned to a proxy object parented to the character's upper chest bone instead. To achieve this, first create an object with a name like ItemMatcher as a child of the upper chest bone (the last spine bone before the neck) and position it to roughly shoulder height. You will then need to assign this object to the Upper Body Target in the MotionController component. Each frame, the upper body root object will be positioned to match the target object. Rotation will be controlled by the aim controller.
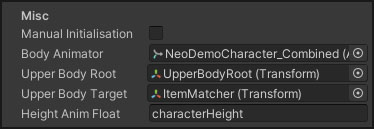
The Height Anim Float is a float parameter in the character's animator controller. This is a zero to 1 value, where 1 is the full height of the character. This can be used in a blend tree to blend movement and idle animations between standing and crouched versions. Without this parameter, the character will not be able to crouch. The Body Animator property should point at the animator component of the character model.
In order to utilise the various IK features of unity to match character feet to the ground and hands to the weapon, you will need a number of components adding to the character body, along with some tweaks to the character's Animator component. Firstly, you need to make sure that the Culling Mode in the character's Animator is set to Always Animate. If you don't do this, then when you look up the character animation will stop, which means the root motion and head movement will also stop. The additional components you need to add are:
- FirstPersonBody. This component handles the foot IK and the optional aim animation parameters (see "Spine Kinematics" below).
- FirstPersonBodyRootMotion. This component captures root motion from the character animations and sends it to the MotionController on the character root.
- FirstPersonCharacterArms. This component handles IK matching the character hands to animated proxy objects on the weapon. In the case of a split weapon rig, this component can realigin the arms object to match the weapon view-model so that the animations sync properly.
- ProceduralSpineAimMatcher. This component rotates the various spine bones to bend and twist the character spine as they aim up/down and side to side. See "Spine Kinematics" below for more details.
- DeathAnimation. This is a simple component that just sets a bool parameter in the character's animator controller when the character dies. In most cases the default properties will work well for all of the above components.
The last things that need doing to separate a full body character from a standard character are replacing the damage colliders and seeker targets. In a standard character, these are just positioned in the hierarchy. In a full body character they should be attached to the character. This means adding child objects to the limb bones of the character, set to the CharacterPhysics layer, and adding a collider component and one of the damage handler components. This allows you to set per-limb damage multipliers and critical flags. The seeker targets require a collider on the AiVisibility layer.
Weapon Setup and Hand Matching for Full Body
Matching the character hands and arms to your weapons requires 2 main components. A WieldableItemKinematics component on your weapon points at the bones or objects in your weapon rig that represent the animated hands for the weapon. The FirstPersonCharacterArms points at the bones for your character. Each frame, after the character and weapon animations have been updated, the hands of the character are positioned and rotated using IK to match the target objects on the weapon. The fingers are then rotated to match as well.
Since you will often be sourcing weapons and characters from different places (different asset publishers, stores or even different 3D content creation software), it is often the case that the target hand rig on the weapon and the hand rig on the character won't match up. For example, bending a finger might mean a 90 degree rotation on the X axis for one, and a -90 degree rotation on the Z axis for the other. To compensate for this, NeoFPS defines a standardised hand rig, and you can match both the weapon and character to the standardised rig using a HandBoneOffsets asset each.
You won't usually edit these offset assets in isolation. Instead, both the WieldableItemKinematics and FirstPersonCharacterArms components let you apply an offsets asset or create a new one at the prefab location from within their inspectors:

Clicking the "Create Offsets Asset" will create one alongside the prefab with a matching name, plus the "_Offsets" suffix. Alternatively you can share the same offsets asset with multiple weapons or characters with matching hand setups by simply dragging and dropping the asset into the field above. Ticking on "Edit Offsets" will show the settings for the hand bone offsets asset directly below the checkbox in the inspector, allowing you to change its settings in place on the weapon or character. If you have the object with the WieldableItemKinematics or FirstPersonCharacterArms selected in the scene view (while editing the prefab) then you will see a set of gizmos that represent the bones of the hand and fingers. This is the standardised hand rig. Your goal is to edit the offsets so that the hand gizmo has its large arrow pointing from the wrist to the middle finger knuckle (roughly), and its smaller arrow pointing up. The fingers should be aligned so that the length of each gizmo is pointing directly at the base of the gizmo for the next finger joint, and the small arrow is pointing up from the hand. In both these cases, you can visualise up by imagining placing your hand flat, palm down on a table. The small arrows should point up from the fingers in this situation. For example, the following is the before and after for applying offsets to a weapon:
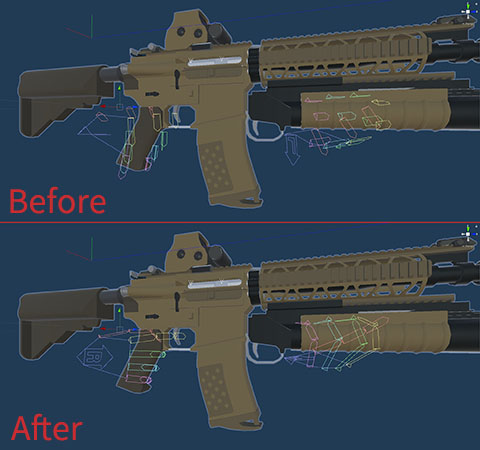
And the following is the before and after for applying offsets to a character:
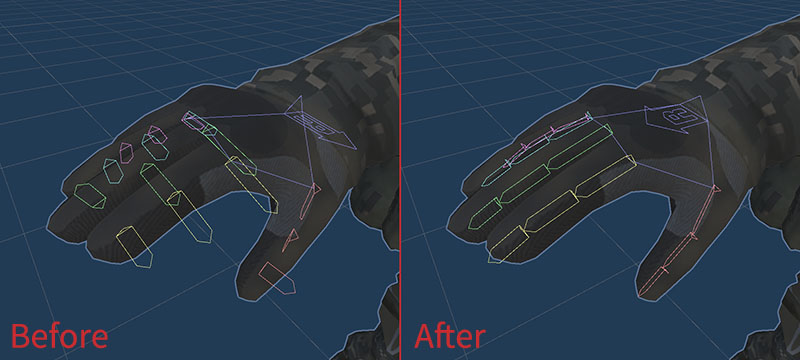
With this completed in both cases, when the character equips a weapon, their hands should match up with the animations on the gun. Do bear in mind though, that this only copies across the position and rotation from weapon to character. If the character's hands are a different size and shape than the targets on the weapon, then you might get some intersection and misalignment. Fixing this is well outside of the scope for an asset like NeoFPS.
Once the hand matching is set up, there are 2 more elements to weapon animations with full body to be aware of:
The next thing to tackle is the position of the weapons. Where in a standard FPS setup your weapons will be centered on the camera, here your weapons are aligned to the upper chest instead. This can mean that they sit very low on the screen and often aren't visible. To compensate for this you can offset the view-model upwards. The root object, pose transform (if applicable) and weapon spring / local weapon object are all affected by procedural animation, so if you move these manually their positions will be reset on entering play mode. Instead you need to offset the view model itself (child of the weapon spring in a NeoFPS firearm's hierarchy). If the view model has animations that affect the root position (resetting it on play) then you can either switch on root motion for the view model, or add a new object between it and the weapon spring / local weapon object and offset that instead.
Finally, another side-effect of the camera position relative to the weapon is that the old firearm aimer modules will no longer correctly align to the optics of the weapon. In order to align the weapon correctly when aiming down sights, you will need to use a CameraConstraintsAimer on your firearms. This detects the FirstPersonCameraTransformConstraints component in the camera hierarchy and sets a new constraint when aiming.
Torso and Legs
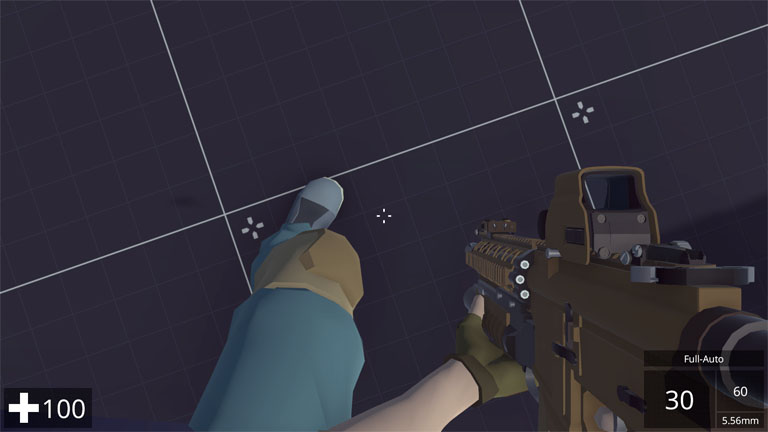
The torso and legs body uses more traditional hand, arm and weapon animations. It is only intended to give you a body that you can see when you look down. The setup is similar to the full body, with the following differences:
- In the MotionController component, you should set the UpperBodyTarget property to point at the camera proxy you are using for the camera constraints.
- Do not add the FirstPersonCharacterArms component to the animated character object.
- Weapons are regular first person weapons, with none of the first person body components required. Arms should be built into the weapon instead of using the character arms.
Split Weapon Rig
(Images Coming Soon)
This setup is used with weapon assets that come with separate arm and weapon rigs. If the arms are part of a full body then you will need to use the full body setup above, but if the arms do not have a body attached then they can be added to the character and shared across multiple weapons.
In order to achieve this, you need a much simpler setup similar to the standard characters.
Firstly, alongside the ItemRoot object in the hierarchy, you should add your character arms prefab. To this you need to add a FirstPersonCharacterArms component and set its Arms Root Transform to point at the object's transform component.
Next, create a FirstPersonCharacterAnimationProfile asset in the project folder and point it at the character's animator controller. With this done, you can select which animations you want to expose for overrides, and give them more descriptive names. On each of your weapons, you will need to add a WieldableItemBodyAnimOverrides component. You can point this at the FirstPersonCharacterAnimationProfile asset you created for your character and then override specific animation clips for the arms by selecting the named animation from the list and dropping a replacement clip into the field.
You will also need to add a FirstPersonCharacterInventoryWatcher component to the root of the character. This ties into the inventory system and detects weapon selection changes. When the selected weapon changes, this component grabs the new weapon's WieldableItemBodyAnimOverrides component and applies the animation overrides to the character.
If your arms do not perfectly match your weapons (eg you are using a variety of arms from different assets), then you can use the IK features by adding a WieldableItemKinematics component to your weapon object and pointing it at animated proxy objects on the weapon you want to match to. You can use a HandBoneOffsets asset to match the hands and finger rotations precisely. For this to work, your arms rig must be humanoid based.
Spine Kinematics
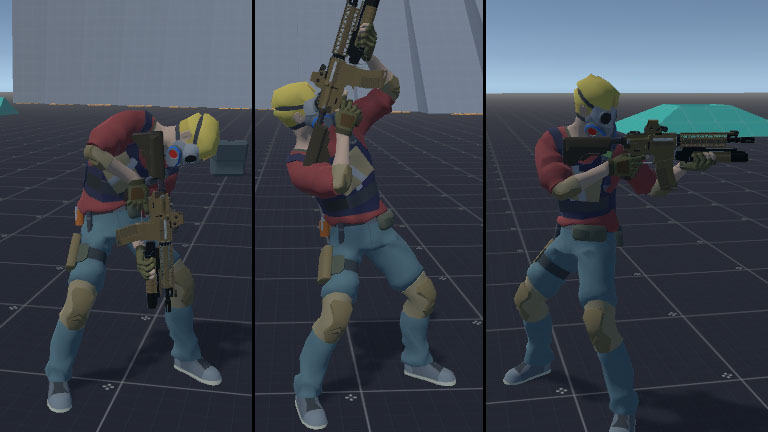
In order to prevent the camera, weapon and character body from intersecting when looking up or down, the character needs to be able to bend their spine based on the look direction. The NeoFPS aim controllers also have a steering system that disconnects the character body direction from the look direction. This allows you to do things like force the body to align with a ladder while still letting the player look around, and provides more physicality and inertia to the body when the player rapidly changes their aim direction while moving. This steering system means that the charater needs to be able to twist their upper body left and right.
There are 2 ways to achieve this:
- Firstly, the FirstPersonBody component allows you to send the aim pitch and aim yaw (angle delta from character heading) to the character body Animator so that they can be used with an additive blend layer. This requires you to have additive pose animations for each direction that you can use to set up a blend tree.
- Alternatively, you can use the ProceduralSpineAimMatcher component. This interpolates the pitch and yaw for each bone up the spine and applies that rotation on top of the animation. This gives less scope for controlling weapon pose, etc in the animation, but it tends to give more reliable results that work across different upper body poses with much less effort. The screenshots above use this procedural system.
Character Shadows
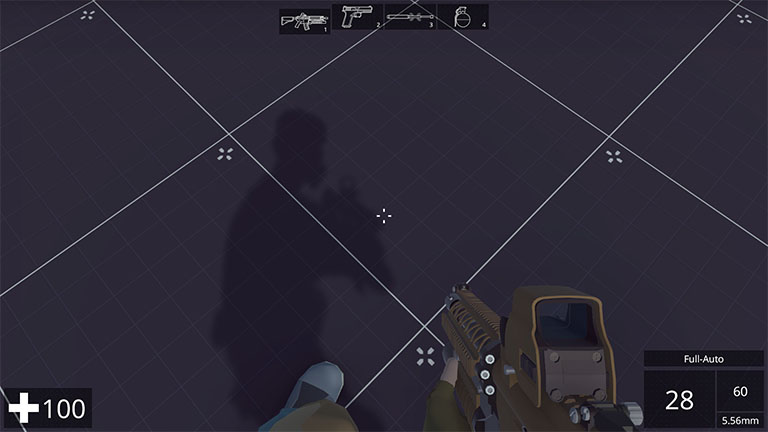
The full-body setup is currently the only option that allows you to give your first person character an accurate shadow. To achieve this the head should be split from the rest of the character body, either as a separate skinned mesh, or as a standard mesh that is parented to the bone. You can then set the head up as a shadow caster (does not render visible geometry to the camera) in the Skinned Mesh Renderer component by setting Cast Shadows to Shadows Only and switching off Receive Shadows.
The torso and legs setup will be adapted to work as a shadow caster in the future. Due to the way that the weapons are aligned to the camera in this setup, looking up or down to far will cause the weapon and arms to rotate away from the body. This means that the arms will be visibly disconnected in the shadow in a way that using separate shadow casting arms with IK on the body would not be able to overcome.
The solution to this is to have a separate external version of the weapons, along with full body animations for their use. The modular firearm modules would then send animation data to the weapon animator and the character body animator at the same time to sync them up. Since the character animations are only used for shadow casting, they would not need to match exactly or be the same quality as the first person animations. This is exactly the same setup that the vast majority of multiplayer FPS have for displaying remote player characters. When looking at another player character you are not seeing the same weapon and animations they are. Instead you are seeing a lower detail weapon that can lod out at a distance and has much less moving parts, and uses much more generic animations (eg simpler finger rigs, and magazines that don't drop to the floor on reload). It is only very recently that a limited number of multiplayer games have started using the same animations for first person and external views, and this lends them a very distinct look that might not suit all game styles.