Modular Firearms
Overview
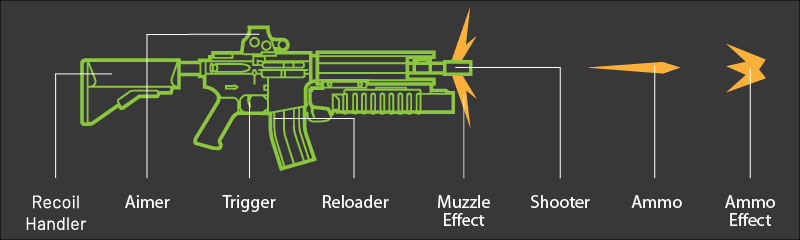
Gun style weapons in NeoFPS use a system of modules that work together with a central ModularFirearm behaviour to model the behaviour of a firearm. Multiple modules of each type can exist on a firearm at any time, but only one of each can be active. When another is enabled it automatically disables the previous. Modules can be attached to a child gameobject of the firearm, or on the same gameobject. This allows for weapon behaviour to be built on attachments that can be swapped in and out at runtime.
Alongside the information below, we also have a youtube playlist that deep dives into the modular firearm systems:
Creating a Modular Firearm
There are 2 ways to create a new modular firearm. The quickest and easiest is to use the Modular Firearm Wizard in the NeoFPS Hub. You can find out more about this on the NeoFPS Wizards page. The more flexible approach is to use the Modular Firearm component itself.
You can create a new modular firearm using the ModularFirearm behaviour's quick-setup controls in the inspector. Create a new GameObject in the scene and add the ModularFirearm behaviour to it. To start off with, the behaviour will be in quick-setup mode. This allows you to select a model to use, along with a few basic choices on input and inventory type. Once you have completed quick-setup you will see a "modules" section, which allows you to pick from the available firearm modules as listed below. Any errors in the setup of the modules will be shown in this section, and the module will be highlighted. For more information, see the ModularFirearm behaviour reference.
Wieldables vs Quick-Fire
The demo firearms are all set up as wieldable. If a firearm is wieldable, that means it is equipped when selected, and then you have to hit the primary fire input to shoot. You can achieve this with your firearms by adding an FpsInventoryWieldable or FpsInventoryWieldableSwappable behaviour to the root of your weapon prefab depending on your choice of inventory. These handle selection and deselection, and also define which quick-slot they apply to.
Alternatively, you can set up your firearms as quick-use items. This means that when you select them, the weapon will raise and then immediately shoot before lowering again. This can be used alongside another equipped weapon (optionally interrupting its use). To achieve this, you would add an FpsInventoryQuickUseItem or FpsInventoryQuickUseSwappableItem behaviour to the root of your prefab instead of the wieldable behaviours above.
Modules
The modules that work together to model the firearm are as follows:
Shooters
Shooter modules are responsible for the actual gunshot. This could mean checking a raycast or spawning a projectile. The shooter is provided with a source position and direction, an accuracy value (0 to 1) and an ammo effect. NeoFPS comes with the following examples:
| Name | Description |
|---|---|
| HitscanShooter | The hitscan shooter uses a physics raycast to detect a hit. |
| BallisticShooter | The ballistic shooter spawns a BallisticProjectile object and passes the ammo effect to it to handle any impacts. |
| SimpleBallisticShooter | The simple ballistic shooter spawns a BallisticProjectile just like the ballistic shooter, but isn't affected by accuracy or the camera aim. |
| SpreadHitscanShooter | The spread shooter acts as a cone of hitscan shooters. It is used for weapons like shotguns. |
| SpreadBallisticShooter | The ballistic shooter spawns multiple BallisticProjectile objects in a cone and passes the ammo effect to them to handle any impacts. |
| PatternHitscanShooter | The pattern hitscan shooter fires multiple hitscan shots in a preset pattern. |
| PatternBallisticShooter | The pattern ballistic shooter spawns multiple BallisticProjectile objects in a preset pattern. |
The modular firearm shooters allow the choice of either hitscan or projectile versions. Hitscan shooters cast an instant ray from the gun barrel. This helps them feel very responsive, especially at close quarters. Projectile shooters spawn a projectile at the weapon's muzzle tip. These projectiles have full control of their movement and hit detection, and then pass the hit info back to the relevant ammo effect. Some example projectiles include the BallisticProjectile, BallisticProjectileWithSimpleDrag and BallisticProjectileWithParticles.
Triggers
Trigger modules handle the rate of fire of the firearm and react to input. NeoFPS comes with the following examples:
| Name | Description |
|---|---|
| AutomaticTrigger | The automatic trigger models a machinegun with a set rate of fire. It will keep firing as long as the trigger is held. |
| SemiAutoTrigger | The semi-auto trigger fires one shot for each press of the trigger. It can optionally repeat fire after a set time. |
| BurstFireTrigger | The burst fire trigger fires a set number of bullets at a set rate of fire. It has options to repeat after a set time and to allow / disallow cancelling the burst. |
| ChargedTrigger | The charged trigger must charge up before firing. If the trigger input is released the charge drops. Once the trigger has been charging for a set time the gun will fire. |
| ContinuousTrigger | The continuous trigger fires every frame and is used for weapons like flamethrowers or beam weapons. |
| QueuedTrigger | The queued trigger will queue up shots up to a maximum count while the trigger is held, and fire once it's released. You can optional cancel with the reload button. |
| TargetLockTrigger | The target lock trigger will lock onto any valid targets within the firearm's detection cone. Holding the trigger will build the lock. Releasing the trigger at full lock will fire. Releasing early or hitting reload will cancel the lock. |
| MultiTargetLockTrigger | The multi-target lock trigger is essentially a queued trigger that locks onto a unique target for each shot. |
Ammo Effects
Ammo effect modules specify what happens when a shot actually connects with something. This includes the impact visuals and audio, dealing damage and adding impact forces. NeoFPS comes with the following examples:
| Name | Description |
|---|---|
| BulletAmmoEffect | The bullet ammo effect uses the Surfaces system to react to a hit. |
| AdvancedBulletAmmoEffect | The advance bullet ammo effect expands on the BulletAmmoEffect to add randomised damage and damage drop off over range. |
| PooledExplosionAmmoEffect | The pooled explosion ammo effect spawns an explosion at the impact point. |
| ParticleAmmoEffect | The particle ammo effect spawns a pooled ParticleImpactEffect particle system at the impact point. |
| PenetratingHitscanAmmoEffect | Penetrating ammo effects allow shots to penetrate through surfaces up to a specific depth. This version performs a hitscan shot on the other side of the surface. |
| PenetratingProjectileAmmoEffect | Penetrating ammo effects allow shots to penetrate through surfaces up to a specific depth. This version spawns a new projectile on the other side of the surface. |
| RicochetHitscanAmmoEffect | Ricochet ammo effects allow shots to bounce off surfaces based on the hit angle. This version performs a hitscan shot from the point of impact. |
| RicochetProjectileAmmoEffect | Ricochet ammo effects allow shots to bounce off surfaces based on the hit angle. This version spawns a new projectile at the point of impact. |
| SurfaceBulletPhysicsAmmoEffect | The surface based bullet physics ammo effect gives detailed per-surface type control over a projectile bullet's penetration and ricochet behaviour. Surface info is specified in a SurfaceBulletPhysicsInfo asset. |
| TargetTrackingAmmoEffect | The target tracking ammo effect is a targeting system. The last object hit with this ammo effect will become a target for guided projectiles. |
| DelegatedTargetTrackingAmmoEffect | The last object hit with this ammo effect will be assigned as the target in the connected TransformTargetingSystem. |
Ammo
The ammo module handles the ammo type of the weapon. This includes the total and current amount. NeoFPS comes with the following examples:
| Name | Description |
|---|---|
| SharedPoolAmmo | The shared ammo pool references an ammo inventory item. This allows ammo to be shared between multiple firearms. |
| CustomAmmo | Custom ammo is a self contained ammo component unique to the firearm it is attached to. |
| InfiniteAmmo | The infinite ammo module is actually both an ammo module and a reloader module. It completely removes the need to reload. |
| RechargingAmmo | The recharging ammo will build up its ammo pool up to a maximum over time. |
Reloaders
Reloader modules act like the magazine attached to the firearm. It reloads using ammo from the attached ammo module. NeoFPS comes with the following examples:
| Name | Description |
|---|---|
| SimpleReloader | The simple reloader holds a set amount of ammo and reloads it all in one go. |
| ChamberedReloader | The chambered reloader uses a different delay and animation when reloading from empty vs with a round chambered. |
| IncrementalReloader | The incremental reloader is reloaded in chunks. It can be interrupted by firing and resumed later. It is used in the example shotgun to reload one shell at a time. |
| CustomRevolverReloader | This reloader is a variant of the simple reloader that displays the correct number of bullets in the revolver drum and swaps them for empties. It is used to demonstrate how to interact with animations to create complex effects. |
| PassthroughReloader | The passthrough reloader does away with the magazine and fires bullets directly from the ammo module attached to the weapon. |
You can also add the ReloaderCountdown behaviour to a firearm to play audio clips as the magazine count approaches zero. This can be useful for adding a warning sound that the magazine is almost empty, or for effects such as the iconic ping of a garand rifle.
Aimer
Aimer modules describe what happens when the player tries to aim down the weapon sights. A sniper rifle would hide the weapon geometry and show a UI scope. A pistol would raise the weapon to align its sights to the camera. NeoFPS comes with the following examples:
| Name | Description |
|---|---|
| AnimOnlyAimer | Sets an animation bool parameter, but does not affect the camera or crosshair. It is mainly intended for using the modular firearm system with AI. |
| CameraConstraintsAimer | Applies a constraint to the character camera's FirstPersonCameraTransformConstraints component. |
| HeadMoveAimer | Offsets the first person camera to align it to the weapon sights (allows tilt). |
| InstantScopedAimer | Instantly hides the weapon geometry and shows a UI scope. |
| ScopedAimer | Raises the weapon to align with the camera over a set duration. Once the weapon is raised the its geometry is hidden and a UI scope is shown. |
| WeaponMoveAimer | Raises the weapon to align its sights with the camera. |
Recoil Handlers
Recoil handlers define how recoil affects the firearm object when it shoots. NeoFPS comes with the following examples:
| Name | Description |
|---|---|
| BetterSpringRecoilHandler | Uses the additive transform system to add procedural animation when the firearm recoils, along with modifying its accuracy. This new module is more intuitive and easier to control than the old SpringRecoilHandler module. |
| AccuracyOnlyRecoil Handler | Modifies the accuracy of the weapon with each shot, recovering over time. |
| SpringRecoilHandler | (Deprecated) Uses the additive transform system to add procedural animation when the firearm recoils, along with modifying its accuracy. This has been replaced by the BetterSpringRecoilHandler module. |
Muzzle Effects
Muzzle effect modules display the muzzle flash of the weapon and plays gunshot audio. NeoFPS comes with the following examples:
| Name | Description |
|---|---|
| BasicGameObjectMuzzleEffect | Activates a game object for a brief period and then deactivates it again. Picks audio at random from an array of audio clips. |
| SimpleParticleMuzzleEffect | Triggers a particle system to emit with each shot. |
| AdvancedParticleMuzzleEffect | Triggers one or more particle systems to emit with each shot. The particle systems are reparented to the character on start so they can persist between weapon switches, and to allow simulation in character space. |
| RandomObjectMuzzleEffect | Activates a game object chosen at random from a pool, and then deactivates it again after a brief delay. Picks audio at random from an array of audio clips. |
Ejectors
Ejector modules optionally throw empty shells out of the weapon when it fires. NeoFPS comes with the following examples:
| Name | Description |
|---|---|
| StandardShellEject | Spawns a pooled shell object and throws it out from the weapon. Can be triggered instantly on firing, after a delay, or with an animation event. |
| ObjectSwapEjector | Swaps the specified object with a pooled physics object. Used to swap animated shell casings with physics based ones at a certain point in the weapon animation. |
| MultiObjectSwapEjector | As the object swap ejector, but can swap multiple items at once. |
| ParticleSystemShellEject | Triggers play on one or more particle systems whenever a shell is ejected. |
Utilities
The modular firearms also come with various utilities to extend them with new features:
| Name | Description |
|---|---|
| AnimatedFirearmSprintHandler | Models firearm sprint behaviour using keyframed sprint animations on an Animator. |
| AttachedAmmoCounter | This is connected to a UI text element to display the firearm's magazine ammo on a world-space UI. |
| FirearmAimFatigue | Applies a stamina drain to the wielder's StaminaSystem when aiming down sights. |
| FirearmOverheat | Adds a barrel glow and haze effect on firing. You can also enable overheating, meaning that once the heat limit is reached, the firearm trigger will be blocked until it cools down enough. This can be paired with a HudFirearmOverheatBar to show the heat status in the player HUD. |
| FirearmTransformMatchSetter | Communicates with a TransformMatcher additive transform behaviour to sync the wielder's head animation to the firearm. |
| FirearmWieldableStanceManager | Used to specify procedural or keyframed weapon stances such as crouching or falling. |
| HolographicSight | Controls the colour and brightness of a holographic projection weapon optic. |
| LaserPointerAimerSwitch | Combined with a laser pointer, switches the aimer module while the laser is on. |
| ProceduralFirearmSprintHandler | Models firearm sprint behaviour using procedural animmation. |
| RecoilPushback | Add this to a firearm to apply a force directly away from the shot direction when firing. |
| RenderTextureScope | Controls the camera, reticule and material for a render texture scope to add parallax and off-axis fade. |
Animations
Animation of weapons is based in part on the ModularFirearm behaviour and also on the attached modules as well. As different modules behave in different ways they often need to be animated differently to match. For example, the semi-auto trigger uses an animator trigger property to tell the animator to play the trigger press and release animation. The full auto trigger uses a boolean property instead to tell the animator how long to hold the trigger, and the charged trigger uses a float property to tell the animator how much to blend the trigger pull / hammer cock animation.
Each animation key can be changed in the firearm or module's inspector and is set by default to match the example assets provided with NeoFPS.
In some cases, the animation can also define the timing for individual actions such as incrementing the magazine ammo count with the incremental reloader. NeoFPS comes with an example animation event handler called the FirearmAnimEventHandler which catches Unity animation events. It is very simple to implement your own animation event handlers and provides a great deal of flexibility beyond using timers, however in the example modules any potentially timed actions have an option to set a specific wait duration or to wait for an animation event before triggering.
Alongside keyframed animation, NeoFPS also allows you to add procedural animation to your weapons using Additive Transforms and Effects. These can be very simple, such as the spring effects driven by the recoil modules. They can also be more complicated, such as the procedural sprinting animation using the ProceduralFirearmSprintHandler. For larger scale movements, the main modular firearm behaviour has a pose system built in which allows for seamless transitions between poses. This is used by a number of modules such as the WeaponMoveAimer or the FirearmWieldableStanceManager.
Footstep driven animation such as sprinting or weapon bob is driven through a step tracking system attached to the character's motion controller. This ensures that any animations like this sync up, are only active while in the correct movement state, and are correctly driven by the character's velocity. The character's stride length (and therefore bob speed while moving) is controlled by adding a TrackSteps motion graph behaviour to the relevant states or sub-graphs in your character's motion graph.
*Note: If you have a weapon lower animation in your animator controller, then it is a good idea to transition to weapon raise at the end of it. The Unity animator can sometimes fail to transition if too many are triggered in very quick succession (eg tapping between 2 weapon slots), and this will prevent it from causing a problem.
For a guide to creating and using animator controllers for NeoFPS firearms, I have put together a youtube playlist that breaks down some techniques and features here:
Drops and Pickups
Firearms have their own "drop" system that allows a player or character to drop them from their hands. The firearms need their own system to account for ammo usage and additional data such as attachments. When a firearm drop is spawned by dropping the weapon from your inventory, then the attached ammo is set to the amount in the firearm's magazine, and any additional payload data such as attachments are set to match the weapon that was dropped. If the drop is placed in a scene to be used as a pickup, then the ammo count and payload data will be set based on the values in the ModularFirearmDrop inspector.
In the sample assets the ammo can be picked up by walking over the weapon drop, while the firearm itself needs to be interacted with to pick back up. For more information, see ModularFirearmDrop and ModularFirearmAmmoPickup.
The easiest way to create a firearm drop is using the PickupWizard in the NeoFPS hub.
Switching Modes
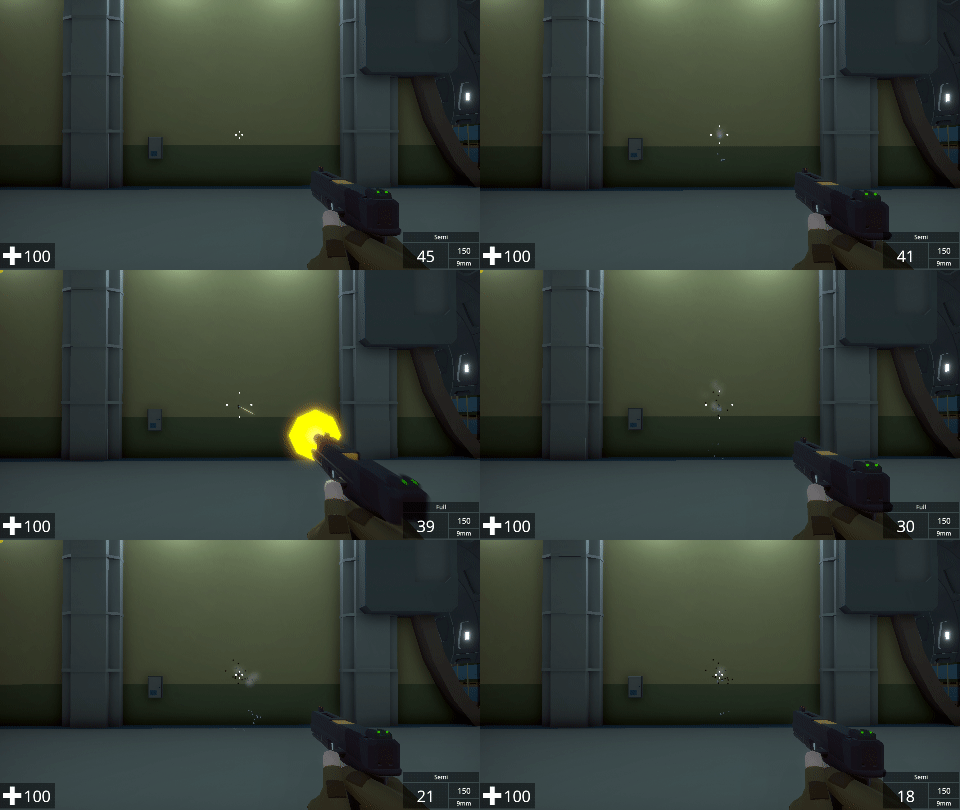
The NeoFPS firearms have a simple system for switching weapon modes. Mode switching is delegated to the ModularFirearmModeSwitcher behaviour, which should be attached to the GameObject with the ModularFirearm behaviour. This works by grouping firearm modules into weapon modes and then enabling them once the mode is switched. Since only one of each type of module can be enabled at any one time, the ModularFirearm behaviour will automatically disable the old modules when new ones are activated.
Some examples of things you can do with the firearm mode switcher include:
- Switching trigger groups to cycle between semi-auto, burst fire and full auto
- Switching ammo types in a grenade launcher
- Swapping aimer and trigger when switching a rifle from close combat to long range mode
- Switching muzzle effect (audio and visual) once a silencer is attached to the gun
Visual Effects
The modular firearms feature various options and modules for controlling their visual effects. The samples are set up with a low poly style that uses simple geometry and objects for muzzle effects and ejected shells. You can also use particle systems to create more realistic effects, and the asset ships with more realistic drop-in replacements for each of the demo firearms. These muzzle effect prefabs can be found at: *Assets\NeoFPS\Samples\Shared\Prefabs\Weapons\MuzzleFlashes*
To use the new muzzle effects, you will need to remove the Basic Game Object Muzzle Effect from the firearm prefab. Navigate through the weapon hierarchy until you find the MuzzleFlash game object. Delete this, and drag & drop the relevant realistic muzzle effect from the above folder into the same place in the hierarchy. Each of these realistic effects is ready set up with an Advanced Particle Muzzle Effect behaviour and positioned based on the main weapon mesh position.
Alongside the muzzle effects, NeoFPS also comes with a variety of hitscan bullet trail prefabs, and projectile prefabs. These can be found in the following folders: Assets/NeoFPS/Samples/Shared/Prefabs/Weapons/Trails/ and Assets/NeoFPS/Samples/Shared/Prefabs/Weapons/Projectiles/
These are dropped onto the relevant property on the shooter module. For hitscan trails, you can set the size/radius and the duration of the trail (for example, the distortion bullet effect works best with a much larger size and longer duration than the additive trails).
Lastly, the NeoFPS samples include a number of shaders to achieve the above effects. These are currently only available for the standard pipeline and located at: E:\Projects\neofps\unity\neofps_stable\Assets\NeoFPS\Samples\Shared\Effects\Shaders
Each of the shaders has been created using the Amplify Shader Editor. If you own this asset, then you will be able to tweak them for your needs or use them as a starting point for your own shaders. Shaders that are intended for use with particle systems, such as the shockwave or fireball sheets make use of vertex colours to control intensity. A number of shaders also expose properties through material property blocks such as the glow amount on the glow shaders or highlight amount on the interactive object highlight shaders.
See Also
FirearmAnimEventHandler Reference